Sales Wins
When a salesperson closes a deal with a customer, they can submit a Sales Win. This creates a company branded PDF that can be shared internally with the sales team to highlight the new customer, what worked, what challenges were overcome and what advice you may have for future sales opportunities. Sales Win documents can help salespeople close deals when unfamiliar with a particular industry; for example, if a salesperson is attempting to close a deal with a client in the pharmaceutical industry, but doesn't have previous experience with that particular client or the pharmaceutical industry, they can use existing Sales Win documents to successfully close the deal. When Sales Win submissions are approved, new customer and contact records are automatically added to your company’s reference platform.
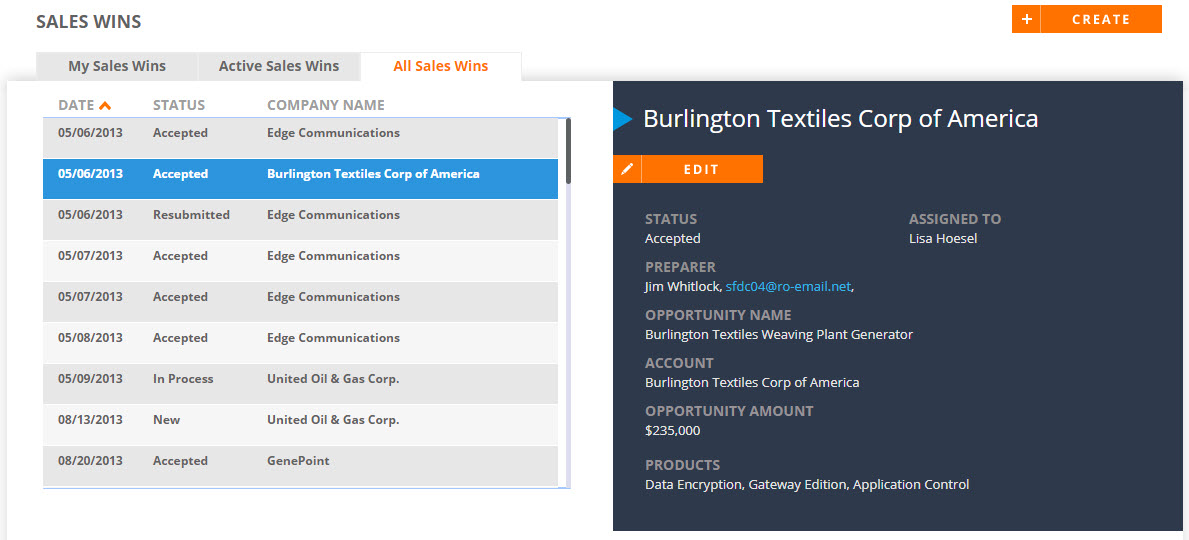
- Navigate to the Sales Win page.
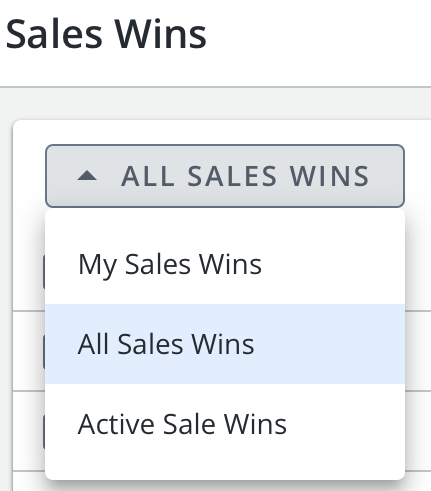
- Select one of the following views:
- My Sales Wins: Sales Wins that you have submitted.
- Active Sales Wins: New and in progress Sales Wins that have been submitted by all users.
- All Sales Wins: All Sales Wins in the system; includes all Sales Wins statuses.
- Click a row to view Sales Win details on the right side of the screen.
- Click the column headers (e.g. Date, Status, Company Name) to sort your Sales Wins.
- Navigate to the Sales Win page using the navigation bar icon,
 .
.
- (Optional) Select a preferred View from the drop-down menu:
- My Sales Wins: Sales Wins that you have submitted.
- Active Sales Wins: New and in progress Sales Wins that have been submitted by all users.
- All Sales Wins: All Sales Wins in the system; includes all Sales Wins statuses.
Note: The RO Platform will remember your View selection. The next time you open the Sales Win grid, your selected View will be displayed as the default.

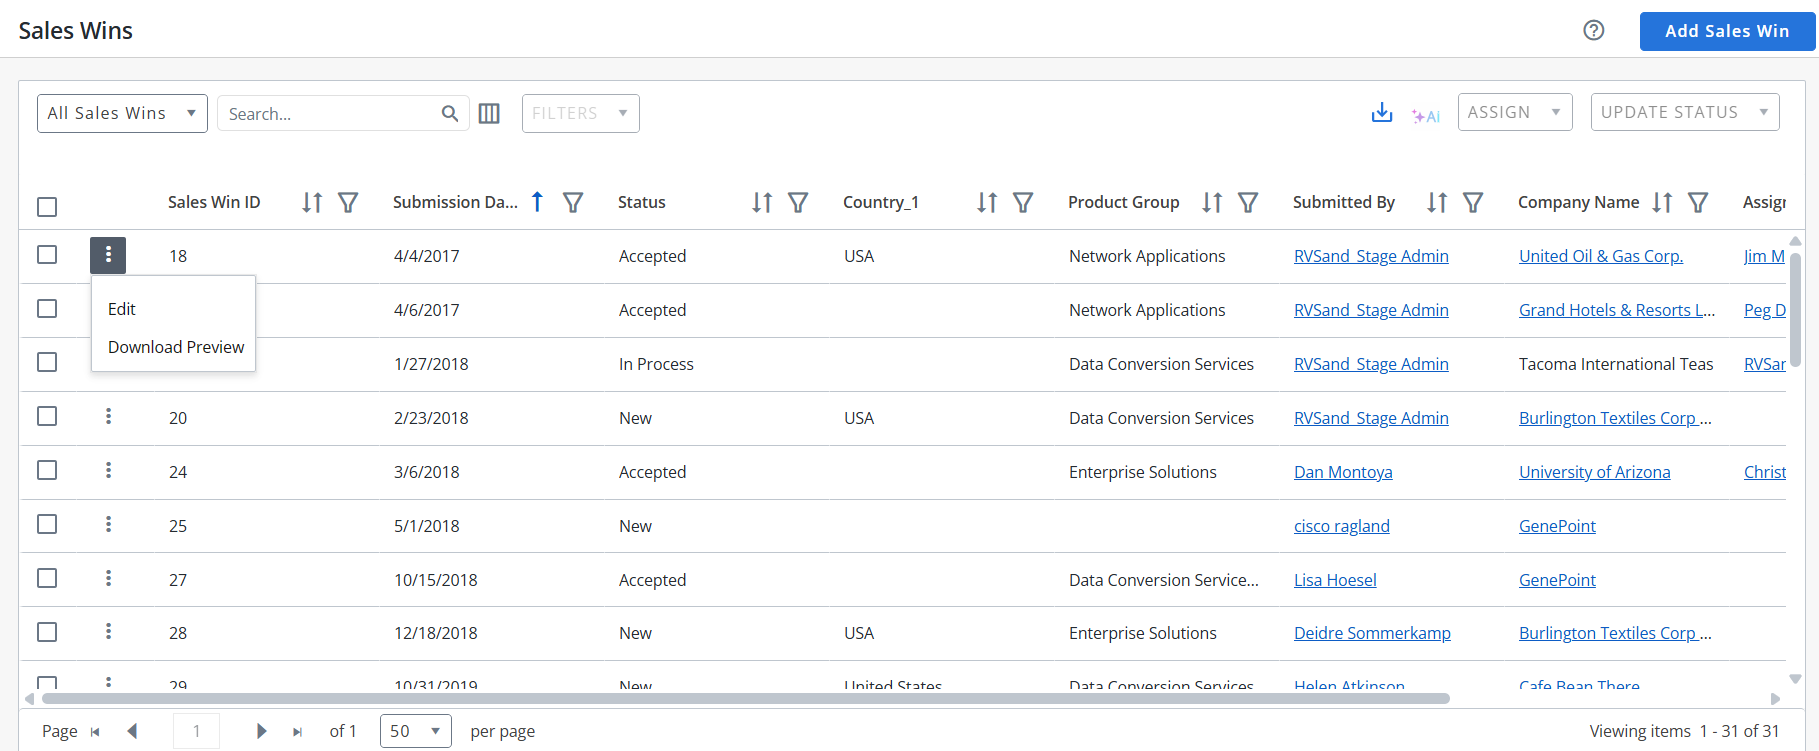
- To perform a search, enter two or more characters into the search bar and click Enter. Results begin populating below the search bar once text is entered. Click the X to clear your search bar.
- To configure the Columns, click the
 button and click on the Column name in the Available section and click the
  button to add it to the Current section. You can also rearrange the Columns in the required order in the Current section by dragging the Column name tiles.
 -
The Sales Win ID column is a default column. You can only rearrange it.
-
Click Reset to Default to go back to the default Column arrangement.
- (Optional) Click the
 button next to the column headers to sort the column from either top-to-bottom or bottom-to-top: chronologically for dates, sequentially for numbers, and alphabetically for text. Your sort selections will be remembered as your default preference. The blue arrow
  next to a column header indicates the type of sorting applied to the column.
 - (Optional) Click the
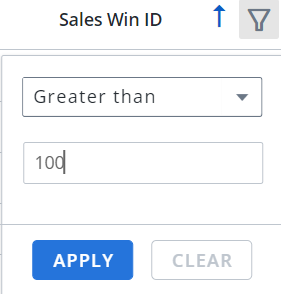
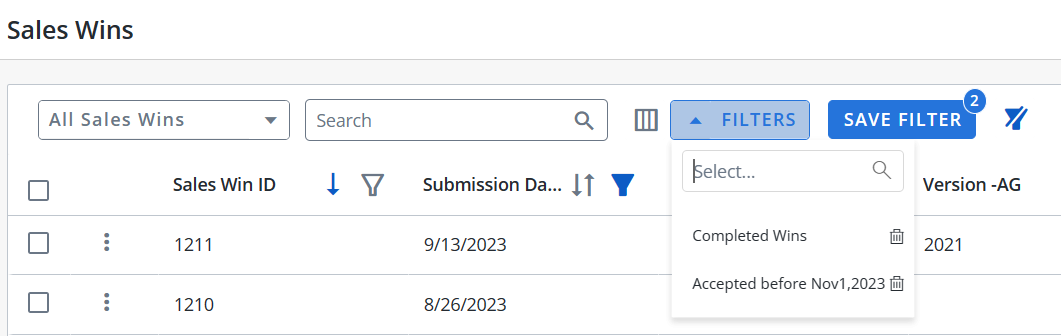
 button next to the column headers to filter what appears in the columns. For example, if you want to filter the Sales Win IDs, then click on the button and select the range type from the drop-down menu (equals, greater than, lesser than or Is null) and enter a number. Click Apply. To save the filters, refer to Using the Saved Filter.
 - (Optional) Click the
 button to export all the records or the filtered records to excel. The exported records will follow the sorting order and the columns customized in the grid.
 - (Optional) Click the
 icon to view the generated AI summary. To enable this icon, select the checkbox(es) of the desired sales win. To generate the sales win summary, see Using the AI Sales Win Summary.
Note: You can select a maximum of 10 Sales Wins to generate the AI summary preview. Clicking the
 icon on the generated summary will download it as a PDF file.
 - (Optional) Use the page scrolling controls at the bottom left of the grid to view Sales Win on other pages. To go to a specific page, click in the field, type the page number, then press Enter. Select the number of rows you want to display in the grid by clicking the drop-down menu.

- Click the
 button on any Sales Win row to use Edit and Download Preview options.
 - Click anywhere on the desired Sales Win to view additional details and the AI Sales Win summary tabs at the bottom of the screen.
Note: If you are an Admin, navigate to Admin > Grid Configuration to set default columns for all users.

Note:
Note: The RO platform will remember your Filter selection even if you leave the Sales Win page and return to it later.
Note:
-
Click the
button on this screen to find options such as Edit, Download Preview and Delete. -
You can only delete a Sales Win using the bottom screen
button. -
The completed Sales Win will display a link to the Sales Win document in the Details tab. To configure the template, see Sales Wins Template Configuration.

Users can generate a Sales Win summary using AI, which analyzes the configured fields to be used for summary generation in the submitted sales win form to quickly create a concise and insightful overview of the sales win.
To generate a sales win summary:
-
Click anywhere on the desired Sales Win and click AI Sales Win Summary tab at the bottom of the screen.
-
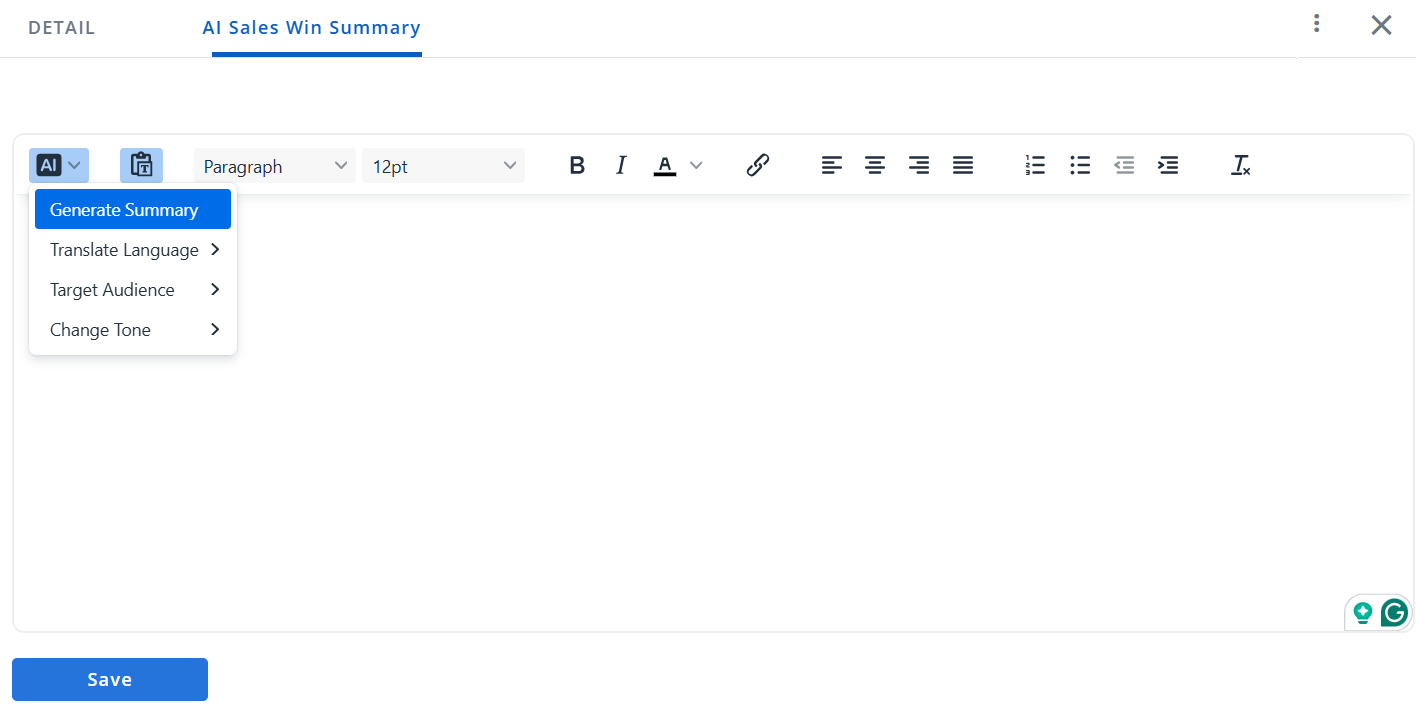
In the HTML tool bar, select the AI drop-down and click Generate Summary. A ROAI Assistant pop-up opens.

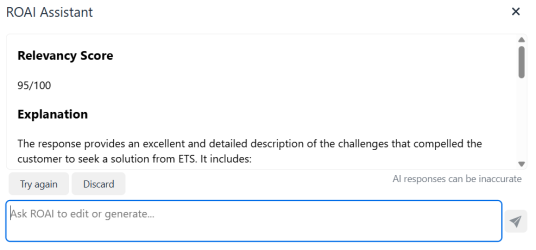
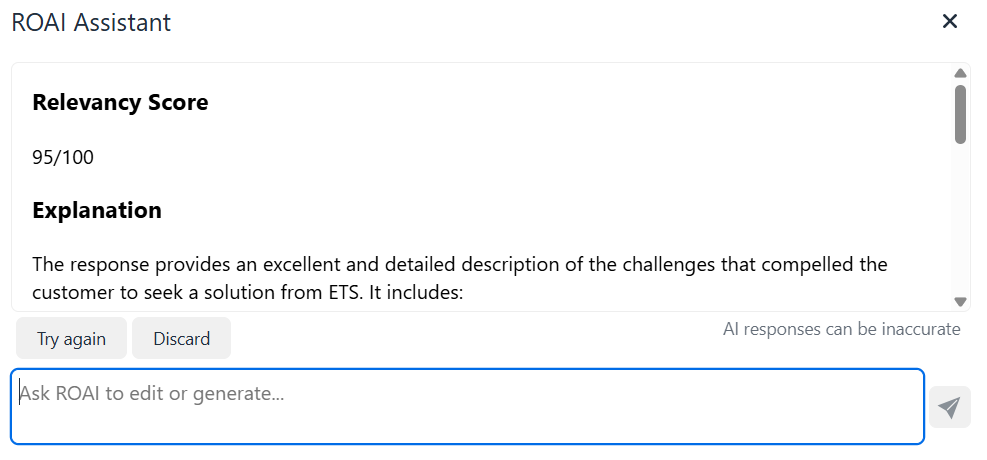
- Review the generated summary and do either of the following:
Click Insert to copy the summary to the HTML editor.
Click Try Again to regenerate the summary.
Click Discard to delete the summary.
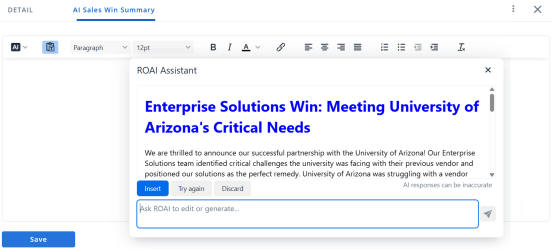
Note: You can have an interactive chat with the AI by entering your questions in the 'Ask ROAI' text box.
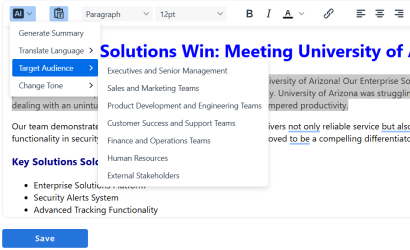
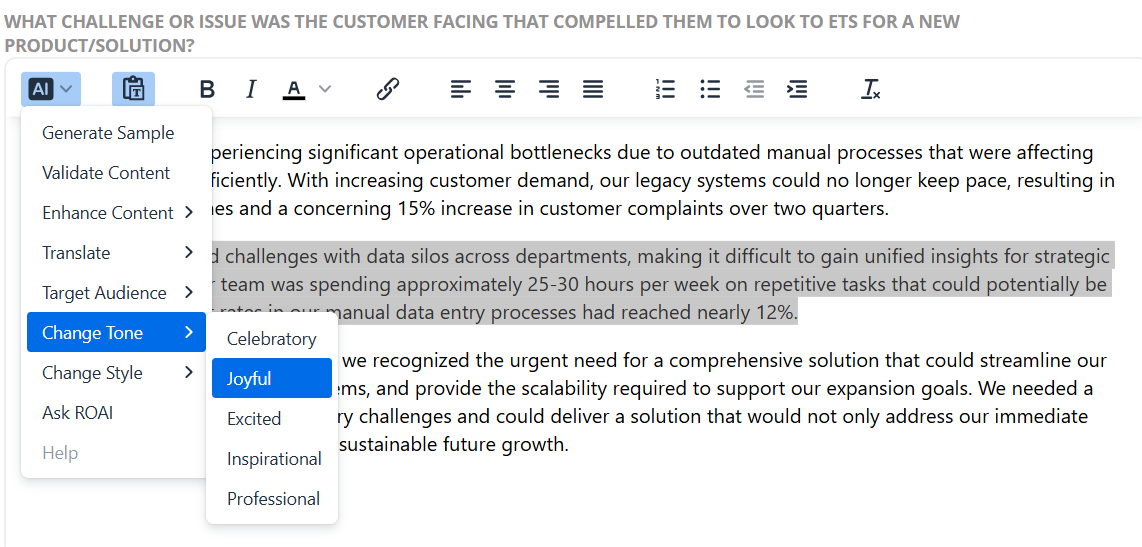
- To generate a response for a specific part of the content, highlight that text and click the AI drop-down to view the following options:
Translate Language: Translates content into English, Spanish, German, French, or Chinese.
Target Audience: Customizes content for specific audiences such as executives, customer support, HR, finance, or external stakeholders.
Change Tone: Select between celebratory, excited, inspirational, professional, and joyful tones.
Note: Users can also use the additional formatting tools on the HTML tool bar to format the content.
- Click Save to apply the changes.


Note: The saved content appears in the AI generated summary preview under the Highlights section, along with the configured the Multi-Saleswin banner.
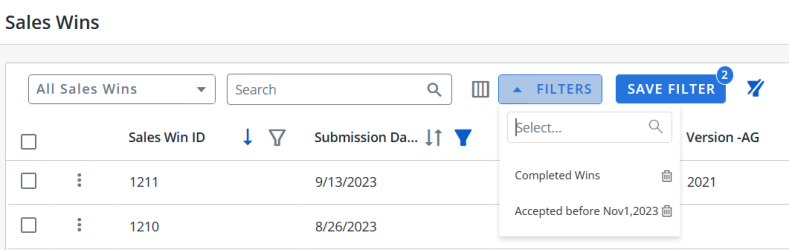
Users can filter the columns based on their requirements and save the filters for future use. This allows users to quickly access the information they need and eliminates the need to manually filter columns every time they use the grid.
To create a saved filter:
-
Filter the columns in the grid as desired. The Save Filter button is displayed next to Filters along with the number of filters applied.
- Click Save Filter and enter a filter name. This dialog displays the column names of the applied filters.

- Click Save to save the filter.
Note: The "Clear All Filters" button,
 , will display once a filter has been applied. Click the icon to clear all applied filters.
 - To find the saved filter, open the Filters drop-down menu and select the desired saved filter.
- To delete the saved filter, open the Filters drop-down menu and click
 icon.
icon.

Note:
-
It is not possible to create saved filters with the same filter name.
-
The RO platform will remember your Save Filter selection even if you leave the page and return to it later.
- Navigate to the Sales Win page.
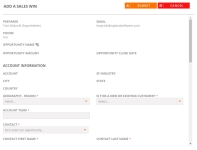
- Click Create. The Add a Sales Win dialog will appear.
- Add your Sales Win details. Fields marked with an asterisk are required.
- Opportunity Name: If your reference system is integrated with a CRM, search for the applicable opportunity. Once selected, related fields will be populated by Opportunity information pulled in from your CRM.
- Account Team: Enter the name of the team for which a Sales Win is being entered.
- Contact: Select the contact for this Sales Win. Contact details will automatically be populated.
- Product: Enter any product details associated with this Sales Win.
- Platform and/or Industry: Select your customer's platforms and industries.
- Sales Win Questions: Depending on how your Sales Wins are configured, answer your Sales Wins-related questions.
- Click Submit.

- Navigate to the Sales Win page.
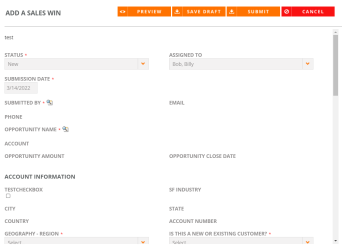
- Click Add Sales Win. The Add a Sales Win dialog will appear.
- Add your Sales Win details. Fields marked with an asterisk are required.
- Status: Enter the status of the Sales Win such as New, In process, Accepted, Complete, and Rejected.
- Assigned to: Enter the name of the user to whom the Sales Win belongs.
- Submission Date: Enter the Sales Win creation date.
- Opportunity Name: If your reference system is integrated with a CRM, search for the applicable opportunity. Once selected, related fields will be populated by Opportunity information pulled in from your CRM.
- Account Team: Enter the name of the team for which a Sales Win is being entered.
- Contact: Select the contact for this Sales Win. Contact details will automatically be populated.
- Product: Enter any product details associated with this Sales Win.
- Platform and/or Industry: Select your customer's platforms and industries.
- Sales Win Questions: Depending on how your Sales Wins are configured, answer your Sales Wins-related questions.
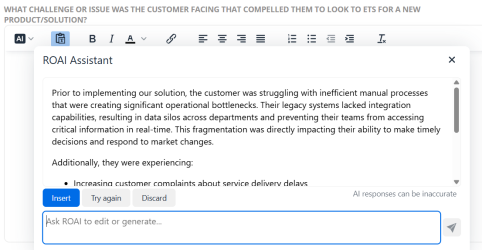
- For HTML fields with an AI drop-down, click Generate Sample from the AI drop-down menu. Alternatively, right-click within the HTML editor to access the ROAI option.
Note: For the AI drop-down to appear, the setting must be enabled in Fields.
- Review the generated sample and do either of the following:
Click Insert to copy the summary to the HTML editor.
Click Try Again to regenerate the sample.
Click Discard to delete the sample.
-
To generate a response for a specific part of the content, highlight that text and click the AI drop-down to view the following options:

Caution: If you have reached the AI consumption limit for your instance, please contact your CSM.
-
Generate Sample: Provides a sample content based on the field.
-
Validate Content: Provides a relevancy score for the content based on the score configuration.
Note:
-
When adding a Sales Win, it is mandatory to validate the score before submission. If the score is not validated or if the validation score falls below the acceptable range defined in the score configuration, the system will display an error upon submission.
-
The Sales Win can only be submitted if each field has a score in the Green or Yellow range.
-
To generate the validation score, the setting must be enabled in the Fields Configuration.
-
-
Enhance Content: Customizes content by summarizing content, improving writing, simplifying language, expanding and trimming content.
-
Translate Language: Translates content into English, Spanish, German, French, or Chinese.
-
Target Audience: Customizes content for specific audiences such as executives, customer support, HR, finance, or external stakeholders.
-
Change Tone: Select between celebratory, excited, inspirations, and joyful tones.
-
Change Style: Select between business, legal, and marketing styles.
-
Ask ROAI: Enter your prompts in the chat box to have an interactive chat with the AI.
-
Help: Displays the usage instructions.
Note: Users can also use the additional formatting tools on the HTML tool bar to format the content.
-
- Click Preview to view your changes before saving.
- Click Save Draft to save the Sales Win without submitting it.
- Click Submit to submit the Sales Win.


Note: The Preview option will be enabled only if all the required fields are filled.
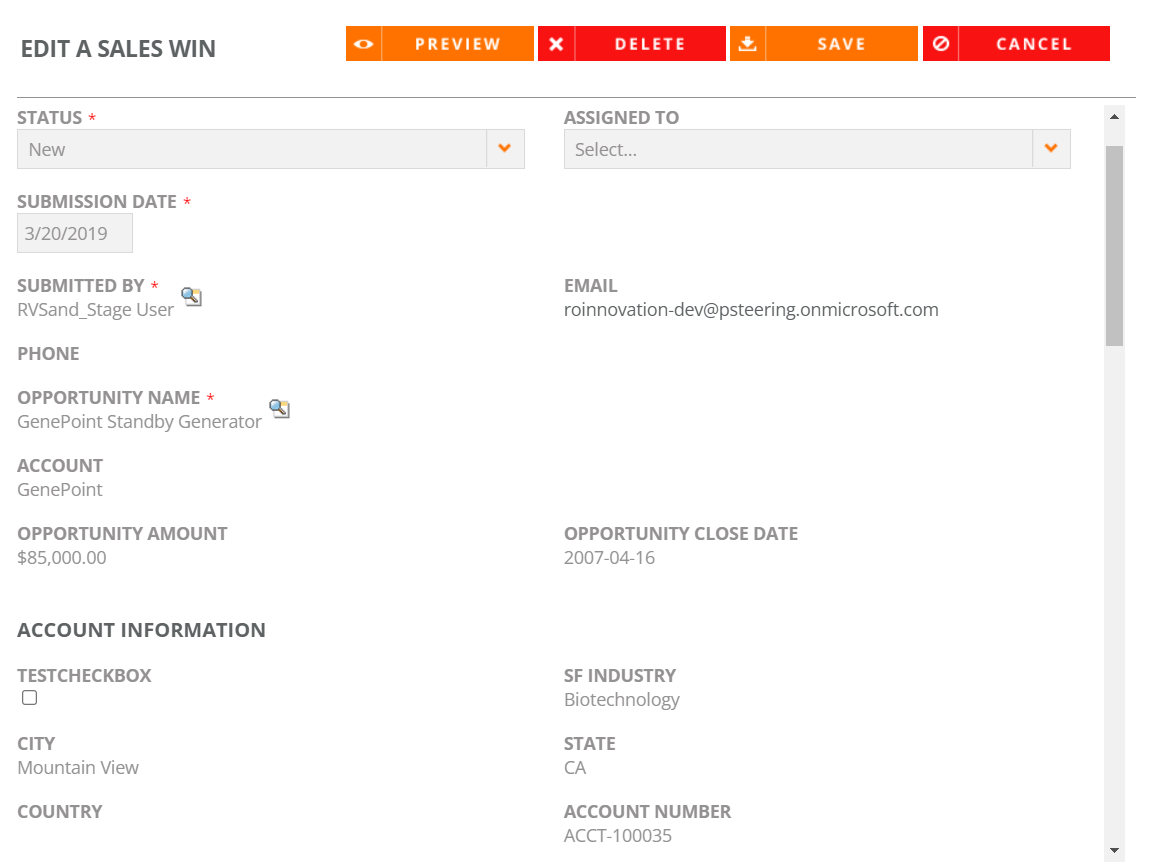
- Navigate to the Sales Win page.
- Once you locate the desired Sales Win, click the row to view details on the right side of the screen.
- Click Edit. The Edit a Sales Win page will appear.
- Edit any desired Sales Win information. Fields marked with an asterisk are required.
- Click Save. For more information on editing Sales Wins, see Adding Sales Wins.
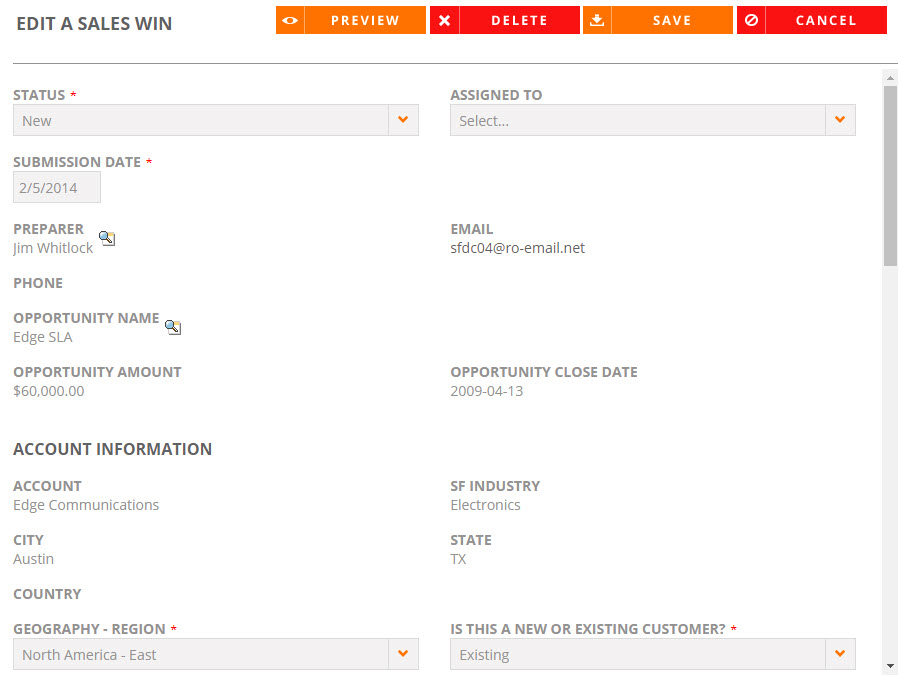
Note: Click Preview to view your changes before saving.
Example: Once a Sales Win status has been changed to Approved, the following steps typically occur next in the workflow:
1. A customer record is created in the RO Platform.
2. Information from the Sales Win submission is written into the customer record.
3. A Sales Wins Report is automatically created and uploaded into the RO Platform as an internal asset.
- Navigate to the Sales Win page.
- Once you locate the desired Sales Win, click button on the Sales Win row and click Edit. The Edit a Sales Win page will appear.
- Edit any desired Sales Win information. Fields marked with an asterisk are required.
- Click Delete to delete the Sales Win record.
- Click Save. For more information on editing Sales Wins, see Adding Sales Win.
Note: Click Preview to view your changes before saving.
Example: Once a Sales Win status has been changed to Approved, the following steps typically occur next in the workflow:
1. A customer record is created in the RO Platform.
2. Information from the Sales Win submission is written into the customer record.
3. A Sales Wins Report is automatically created and uploaded into the RO Platform as an internal asset.
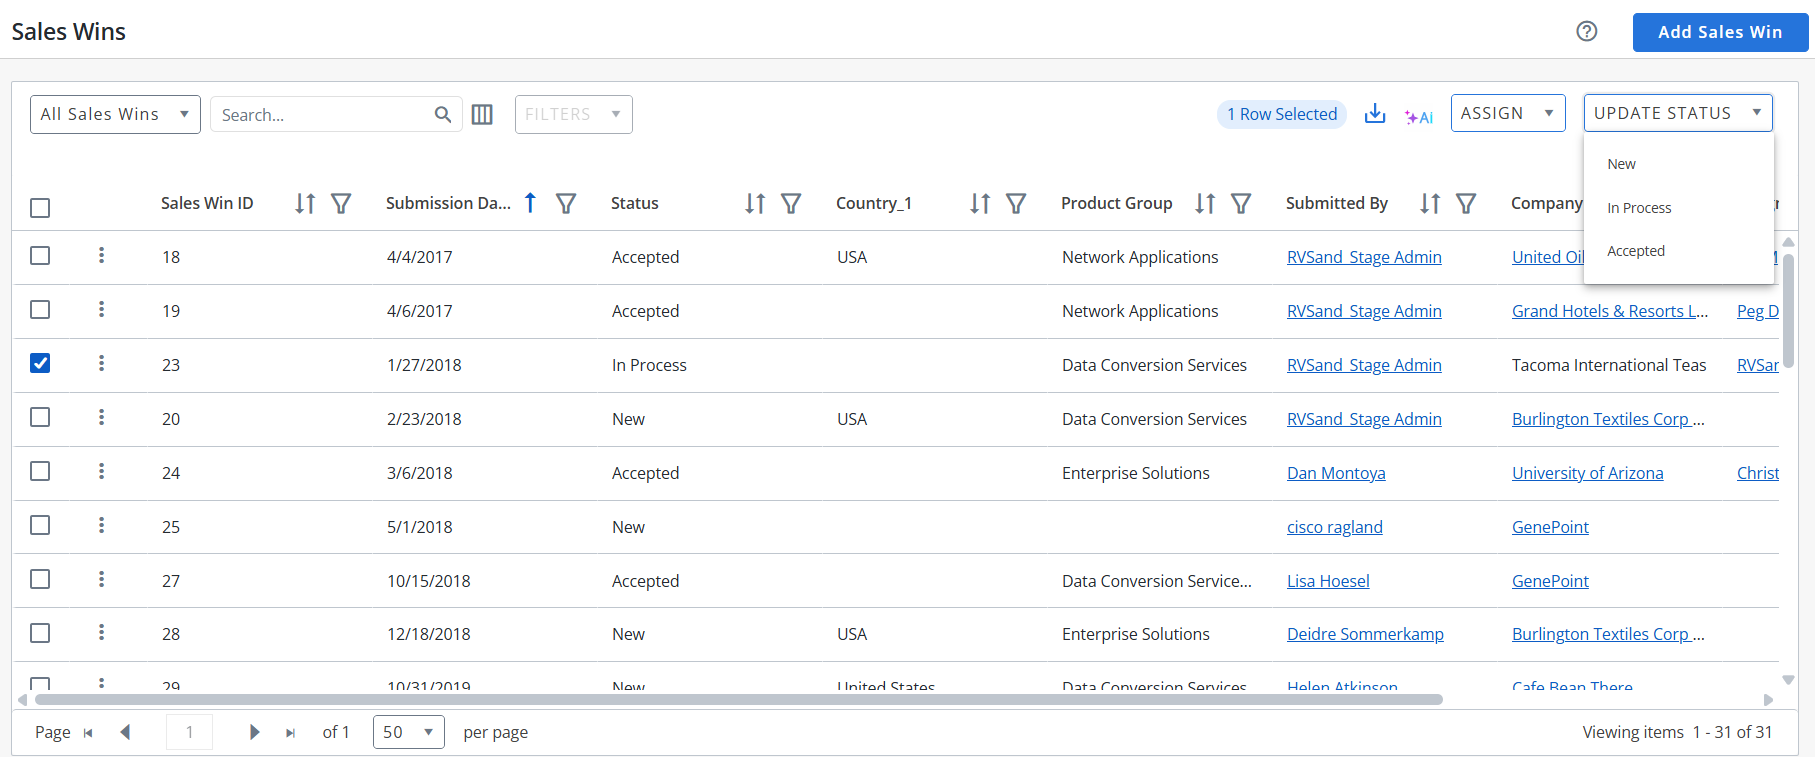
- Select one or more checkboxes to enable the desired Sales Win for bulk actions.
- Click Assign. Available assignees will appear in the drop-down menu.
- Choose the user that will be reassigned to the selected Sales Win.
Note: Select the checkbox in the header to enable all Sales Win for bulk actions.
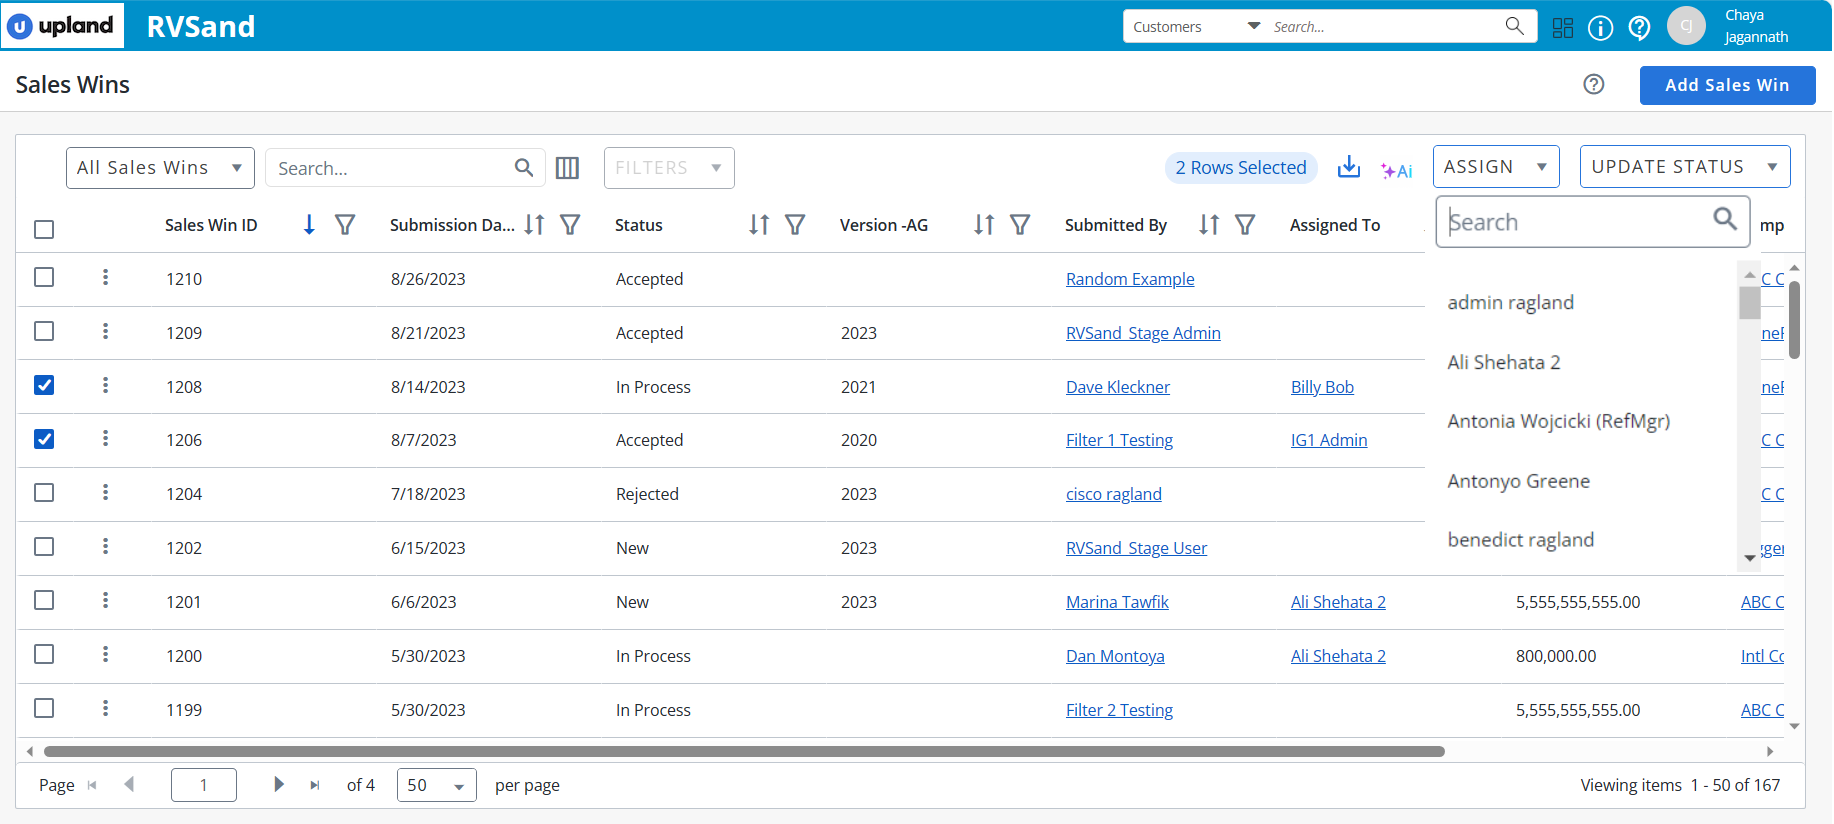
- Select one or more checkboxes to enable the desired Sales Win for bulk actions.
- Click Update Status. Available statuses will appear in the drop-down menu.
- Apply one of the following status to selected Sales Win:
New
Draft
In Process
Resubmitted
Rejected
Complete
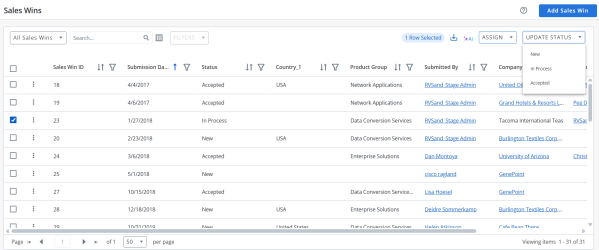
Note: Select the checkbox in the header to enable all Sales Win for bulk actions.
Sales Losses
When a salesperson fails to close a deal with a customer or a Reference Manager rejects a Sales Win, a Sales Loss is submitted.
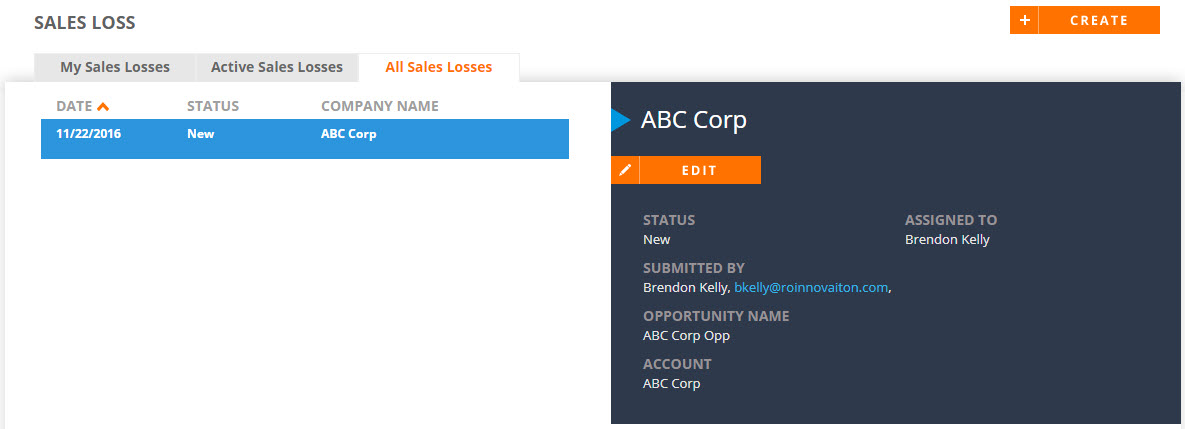
- Navigate to the Sales Loss page.
- Select one of the following views:
- My Sales Losses: Sales Losses that you have submitted.
- Active Sales Losses: New and in progress Sales Losses that have been submitted by all users.
- All Sales Losses: All Sales Losses in the system; includes all Sales Loss statuses.
- Click a row to view Sales Loss details on the right side of the screen.
- Click the column headers (e.g. Date, Status, Company Name) to sort your Sales Losses.
- Navigate to the Sales Loss page.
- Click Create. The Add a Sales Loss dialog will appear.
- Add your Sales Loss details. Fields marked with an asterisk are required.
- Status: Select whether this Sales Loss is New, In Process, or Accepted.
- Assigned To: Select the individual to assign to the Sales Loss.
- Submission Date: Enter the date the Sales Loss occurred.
- Preparer: Search for the associated preparer. Once selected, related fields will be automatically populated.
- Requesting Company Name: If your reference system is integrated with a CRM, search for the applicable company name. Once selected, related fields will be populated by Account information pulled in from your CRM.
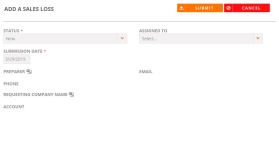
- Click Submit.

- Navigate to the Sales Loss page.
- Once you locate the desired Sales Loss, click the row to view details on the right side of the screen.
- Click Edit. The Edit a Sales Loss page will appear.
- Edit any desired Sales Loss information. Fields marked with an asterisk are required.
- Click Save. For more information on editing Sales Losses, see Adding Sales Wins.
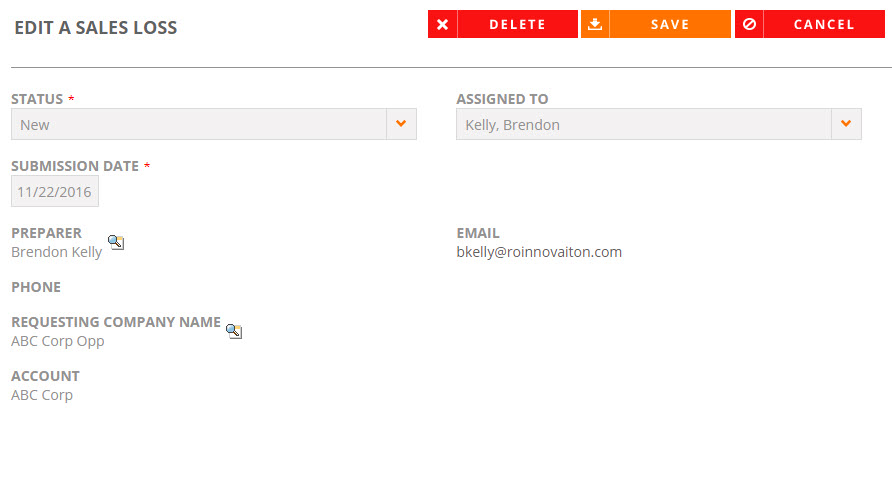
Note: Click Delete to remove a Sales Loss.